5.1 About bottom view and top view
Generally, the bottom view is obtained by projecting from the end face of the PCB of the relay, and the top view is obtained by projecting from the opposite direction (that is, the top surface of the relay housing). Please pay attention when using the product manual and installing the relay.
5.2 Installation direction
Unless otherwise specified, the installation direction of the relay is generally any direction, but in order to make the relay work more stable and reliable, the installation direction also needs to be well considered.
5.2.1 Vibration and shock resistance
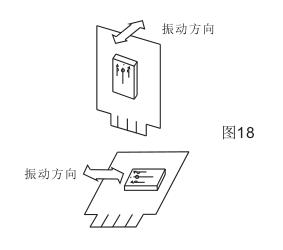
The ideal installation method is to make the movement direction of the contact and the movement direction of the armature at right angles to the vibration and impact direction. Especially when the coil is not energized, the vibration and impact resistance of the normally closed contact is weak. If the installation direction is appropriate, its performance can be guaranteed, as shown in Figure 18.
5.2.2 Contact reliability
When installing, try to keep the contact surface of the relay in a vertical direction. This will not only avoid the accumulation of garbage and dust, but also make it difficult for the spatter and wear powder of the contact to adhere to the contact when an arc occurs.
5.3 Close installation
When multiple relays are installed close together, the mutual interference of heat may cause abnormal heat generation. To avoid heat accumulation, please set a sufficient installation distance.
When multiple substrates are stacked and installed, please be careful not to make the ambient temperature of the relay exceed the specified value in the product manual.
5.4 Installation of mounting ears
To prevent damage and deformation, use washers when installing. The tightening torque should be within the range of (0.49~0.686)N•m and (5~7)kgf•cm. To prevent loosening, use spring washers.
5.5 Installation of plug-in terminals
When installing plug-in terminal relays, the insertion strength should be 40N~70N (4kgf~7kg).
5.6 Ultrasonic cleaning
Please do not use ultrasonic cleaning to clean the relay, because ultrasonic will cause contact bonding and coil disconnection.
5.7 Installation and welding of THT relay
The general THT type relay installation and welding classification are as follows:
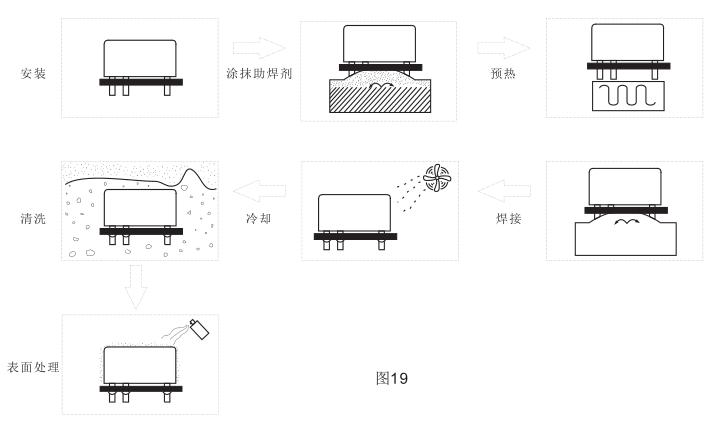
The following describes the precautions when soldering the THT relay on the printed board. Please refer to it for actual use.
Note that if flux enters the relay accidentally, the function of the relay will be impaired. Due to the different protective structures, there will be problems that are not suitable for automatic welding or automatic cleaning, so please refer to the structure and features described in Chapter 2 "3.1 Encapsulation Method".
5.7.1 Installation
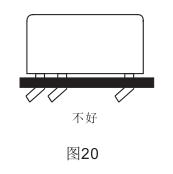
Please do not bend the terminals of the relay (as shown in Figure 20), as this may damage the initial performance of the relay.
Please process the printed board correctly according to the mounting hole bitmap on the product manual.
Please pay attention to keep the relay stable.
Please note that if the fixing force of the mounting hook is too large, it may cause a malfunction in the relay.
5.7.2 Applying flux
Please use non-corrosive rosin series for flux, and use alcohol with less chemical effect for solvent.
Please apply the flux thinly and evenly to prevent it from immersing into the relay. For dip application, please keep the flux level stable.
Please adjust the position so that the flux will not overflow on the printed board.
Please be careful not to make the flux adhere to the parts other than the relay terminals, which may cause the insulation of the relay to decrease.
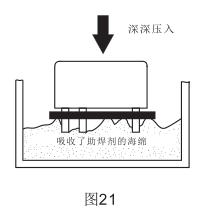
Please note that for dust cover type and flux-resistant relays, do not use the smearing method of deep pressing the printed board from above into the sponge dipped in flux, as shown in Figure 21, this method will cause the flux Go inside the relay. Special attention should be paid to the dust cover type.
5.7.3 Preheat
In order to improve the welding performance, be sure to preheat.
Please preheat under the condition that the temperature is below 100°C (printed board soldering surface) and the time is within 1 minute.
Please be careful not to use relays that have been placed in high temperatures for a long time due to device failures and other reasons. Their initial performance may have changed.
5.7.4 Welding
The welding precautions are shown in the table.

Note:
1) Automatic welding should reduce the preheating and welding temperature as much as possible, and reduce the preheating and welding time, so as to avoid the performance change of the relay due to excessive temperature and long time.
2) Under normal welding conditions, it is normal for some relays to experience slight swelling of the shell due to heat.
3) Manual welding is forbidden to press or pull the lead pins of the relay during the welding process, otherwise it may cause the relay's performance to change or even fail.
5.7.5 Cooling
After automatic welding, in order to avoid aging of the relay or other components due to the heat during welding, please ventilate and cool immediately after welding.
Although plastic-encapsulated relays can be cleaned, please do not send the relays for cleaning immediately after the soldering is completed.
Contact with cold cleaning fluid may damage the internal sealing of the relay.
5.7.6 Cleaning
Please refer to Table 15 to select the cleaning method when cleaning.

For plastic-encapsulated relays, after they are installed on the PCB and soldered, due to the different welding conditions of users, the plastic-encapsulation performance of some relays may be damaged. Therefore, if the relay needs to be cleaned as a whole after soldering, please use our recommendation Welding conditions, and use special plastic packaging products (each household feature number 310).
Please do not use freon, trichloroethane, thinner or gasoline for cleaning.
5.7.7 Surface treatment
In order to prevent the insulation deterioration of printed boards, please pay attention to the following when surface treatment is required.
Dust-proof cover type and flux-proof type will cause malfunctions due to the surface treatment agent entering the inside of the relay, so please do not perform surface treatment or install the relay after the surface treatment.
Because some surface treatment agents have adverse effects on the relay, such as dissolving the shell, please choose carefully and test and confirm in actual use.
Use spraying and brushing techniques as much as possible for surface treatment, and dipping techniques are prohibited. Use normal temperature liquid treatment agent as much as possible for the surface treatment agent, and please spray the surface treatment agent when the relay is cold to normal temperature. The surface treatment agent can be dried naturally; it can also be dried at a constant temperature, but the drying temperature should not exceed 60°C. At the same time, it is forbidden to lower the drying temperature when the surface treatment agent is not dried, otherwise it will easily cause the surface treatment agent to be sucked into the relay and become invalid
When using special surface treatment processes, please contact our company for confirmation so that we can provide suitable products.
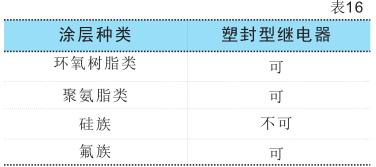
The following suggestions regarding coating are given in the table.
5.8 Installation and soldering of surface mount (SMT) relays
The installation and welding classification of general SMT relays are as follows:
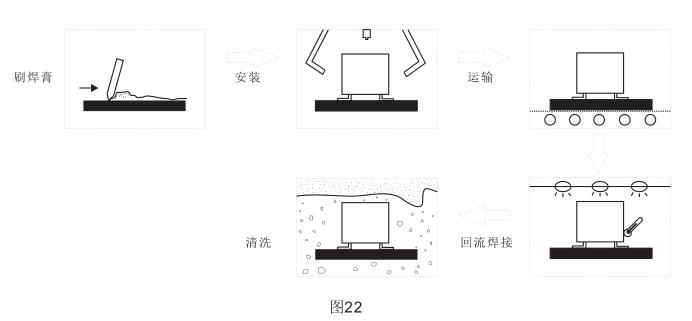
The following describes the precautions when soldering surface mount type (SMT) relays on printed boards. Please refer to them for actual use. Please be careful not to damage the relay during processing.
5.8.1 Brushing solder paste
Please use rosin and non-chlorine solder paste, because chlorine may cause corrosion of relay leads and circuit boards.
Please make sure that the solder paste is applied evenly and the thickness is 0.15mm~0.2mm.
5.8.2 Installation
When installing the relay, unless otherwise stated in the manual, please set the holding force of the paw within the value specified in Table 17.

5.8.3 Transportation
Please make sure that during transportation, the relay will not fall off due to vibration and other factors to avoid poor soldering.
5.8.4 Reflow soldering
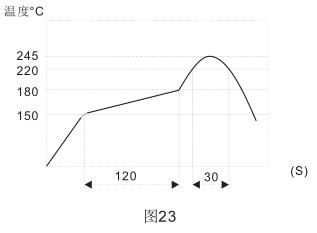
Figure 23 shows the temperature curve of the printed board layout during infrared reflow, but the conditions of each relay may be different, so please refer to the manual of each relay. If there is no statement in the manual, you can use the temperature curve shown in the figure.
Please do not send the relay to be cleaned immediately when the soldering is completed, because sudden contact with cold cleaning fluid may damage the internal sealing of the relay.
Please do not immerse the relay in the flux tank, which will deform the plastic and cause the relay to malfunction.
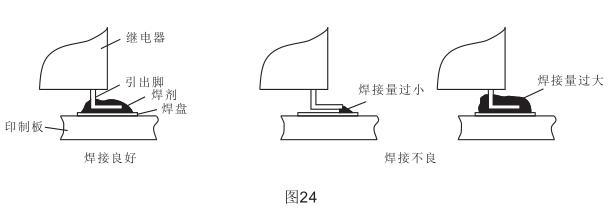
Please refer to Figure 24 for welding status.
5.8.5 Cleaning
Hot washing or immersion washing is possible, and the washing temperature should be controlled below 40°C.
Please use alcohol or water cleaning fluid instead of freon, trichloroethane, thinner or gasoline for cleaning.
Please do not perform ultrasonic cleaning, otherwise it will cause coil disconnection and contact bonding.
Improper welding will cause the sealing performance of the relay to decrease. At this time, avoid cleaning or surface treatment (dipping protective agent) on the relay after welding.